The Env3D NetBeans Plugin
BlueJ is a great IDE for learning Java. It has everything that a beginner needs to get up and running, has an intuitive UI, and allows dynamic creation of objects without writing a "main" method.
The one thing that BlueJ is not intended to do, however, is medium to large size Java development. In my experience (and many students have also observed this), once your program hits 20+ classes, it is a good time to move to a more "professional" IDE, something like NetBeans or Eclipse.
I have been a NetBeans user since 2002, and I use NetBeans to create Env3D itself, so when I think about writing large Env3D programs, I naturally wanted to use NetBeans.
So I have decided that it is time to write a plugin for NetBeans so students can have a way to migrate to a professional IDE. My initial requirements are as follows:
1) A way to create a "Env3D Project"
2) Env3D Projects are visually recognized by the IDE
3) All the deployments options (Applet, Webstart) must be there
4) Must have an easy way to update the project to use the latest version of env3d
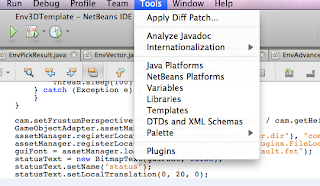
I am pleased to announce that after many hours of studying (googling, trail and error, tears), I finally managed to create an Env3D module that satisfies the above requirements! To obtain this plug-in, first you must install NetBeans. Then go to the "Tools" pull-down menu and choose "Plugins".

You'll need to tell NetBeans where to get the Env3D plugin. From the Plugin dialog box, go to the "Settings" tab and click on "Add", then fill in the following information:
Name: Env3DModule Update Center
URL: http://env3d.org/netbeans/updates/updates.xml

Once you have added the env3d update server, you can now go to the "Available Plugins" tab. The Env3D Module is now available for install (if not, click on the "Reload Catalog" button to refresh the list).

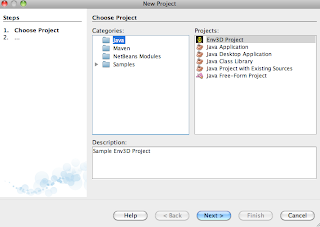
Once the plugin is installed, when you go to create a new project, you'll see a new project type under "Java".

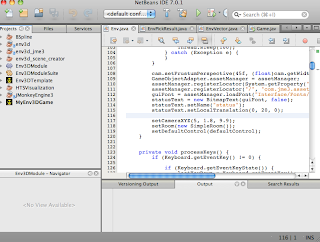
All Env3D projects will have a special icon within the IDE.

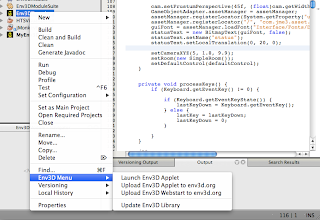
If you right click on the project, the context menu will now have a new item "Env3D Menu". All deployment methods from BlueJ are available.

The last menu item, "Update Env3D Library" will automatically download the latest version of env3d from sourceforge, so your project can be kept up-to-date with the latest and greatest features.
That's it for now. Please test this out and let me know if there are any issues.
Happy programming!
The one thing that BlueJ is not intended to do, however, is medium to large size Java development. In my experience (and many students have also observed this), once your program hits 20+ classes, it is a good time to move to a more "professional" IDE, something like NetBeans or Eclipse.
I have been a NetBeans user since 2002, and I use NetBeans to create Env3D itself, so when I think about writing large Env3D programs, I naturally wanted to use NetBeans.
So I have decided that it is time to write a plugin for NetBeans so students can have a way to migrate to a professional IDE. My initial requirements are as follows:
1) A way to create a "Env3D Project"
2) Env3D Projects are visually recognized by the IDE
3) All the deployments options (Applet, Webstart) must be there
4) Must have an easy way to update the project to use the latest version of env3d
I am pleased to announce that after many hours of studying (googling, trail and error, tears), I finally managed to create an Env3D module that satisfies the above requirements! To obtain this plug-in, first you must install NetBeans. Then go to the "Tools" pull-down menu and choose "Plugins".

You'll need to tell NetBeans where to get the Env3D plugin. From the Plugin dialog box, go to the "Settings" tab and click on "Add", then fill in the following information:
Name: Env3DModule Update Center
URL: http://env3d.org/netbeans/updates/updates.xml

Once you have added the env3d update server, you can now go to the "Available Plugins" tab. The Env3D Module is now available for install (if not, click on the "Reload Catalog" button to refresh the list).

Once the plugin is installed, when you go to create a new project, you'll see a new project type under "Java".

All Env3D projects will have a special icon within the IDE.

If you right click on the project, the context menu will now have a new item "Env3D Menu". All deployment methods from BlueJ are available.

The last menu item, "Update Env3D Library" will automatically download the latest version of env3d from sourceforge, so your project can be kept up-to-date with the latest and greatest features.
That's it for now. Please test this out and let me know if there are any issues.
Happy programming!

0 Comments:
Post a Comment
Subscribe to Post Comments [Atom]
<< Home